

English
Express Supply Invoicing
Express supply invoicing allows you to invoice "on the fly” and generate a formal invoice later. This is handy for billing of incidental purchases or chargebacks. It allows quick entry rather than manual tracking and billing at a later date.
Express Supply Invoicing
- From Main menu, click on the Pencil Cup icon
or click on Accounts Receivable >> Express Supply Invoicing.
We recommend using the TAB key on your keyboard to move from one field to another
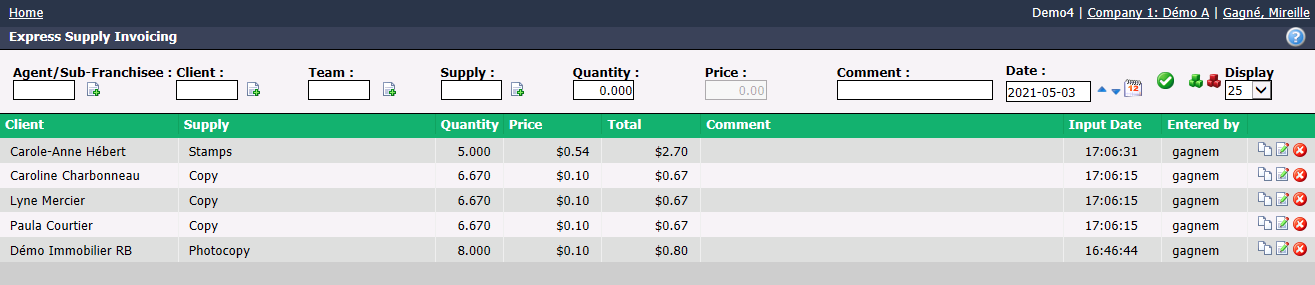
NOTE: The icons to the right of an entry allow you to duplicate it (Double Sheet), edit it (Sheet with a Pencil) and delete it (Red X).
Individual Entry
Enter the name of the Agent , Client or Team you wish to invoice in the appropriate field.
Select a Supply code to invoice and enter a Quantity.
If the Price of the supply is fixed, the field will be greyed out. If price is variable, you can modify it.
Comment entered in that field will appear on the invoice next to the supply name.
Click on the Check Mark button to process.
Your item is now ready to be invoiced once you generate your monthly invoicing.
Grouped (or Batch?) Entry
- Click on the Green Cubes icon (Supplies Input Table).
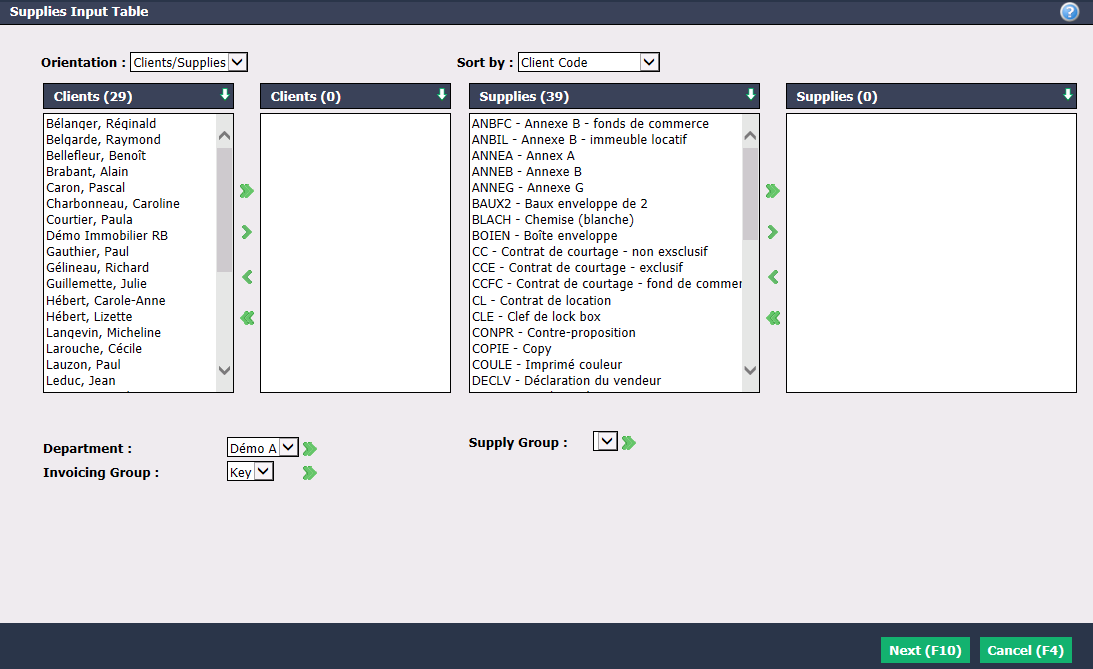
Select the Orientation that clients and supplies will have on the next page (quantity entry).
- "Clients/Supplies": Clients will appear one below the other and supplies will appear next to each other.
- "Supplies/Clients": Supplies will appear one below the other and clients will appear next to each other.
You can Sort by the 3 different codes that are assigned in the clients/agents profile. For more information, please see the articles Adding/Editing a Client and Adding a Regular and/or Incorporated Agent.
- "Client Code": Clients will be sorted alphabetically by client code/agent code.
- "Long Distance Code": Clients will be sorted in ascending order of long distance code.
- "Photocopier Code": Clients will be sorted in ascending order of photocopier code.
NOTE: This option only applies if you select the "Clients/Supplies" Orientation.
- Select the desired Clients and Supplies using the green arrows. The double arrow allows you to select all employees with one click, while the single arrow selects only one at a time.
You can double-click on a client or a supply to select it instead of using the green arrow.
From the drop-down lists, you can speed up the process by selecting a Department or Invoicing Group to select the desired clients and selecting a Supply Group to select the desired supplies. For more information, please see the articles Adding/Editing an Invoicing Group (412) and Adding/Editing a Supply Group (413).
Click on Next.
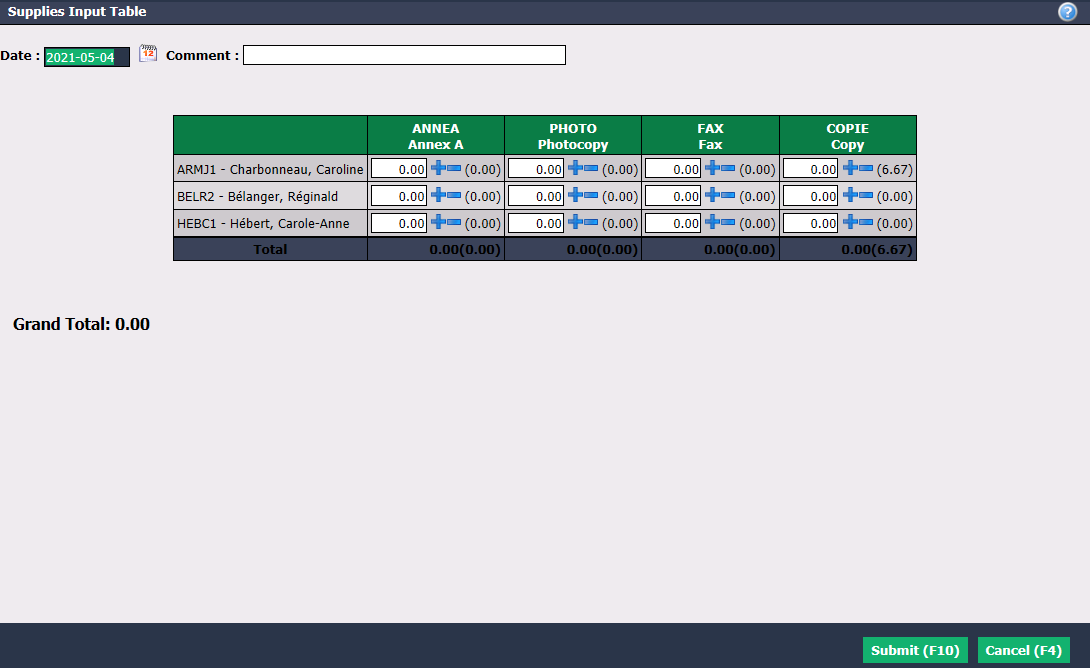
Verify if the Date is right for you (today’s date is automatically displayed). Otherwise, you can change it manually.
You can add a Comment.
Enter the desired quantity for each supply and client.
Click on Submit.
Your items are now ready to be invoiced once you generate your monthly invoicing.
Express Supply Invoicing in a Transaction
It is possible to add a supply in all types of transaction, whether it is a listing, deal, buyer’s contract, refused offer or other income
- Access the "Supplies Invoiced in File" section of the transaction (in the "Listing" and/or the "Deal" part when the transaction is a deal).

- Click on the Dollar Sign icon (Quick Supply Input).
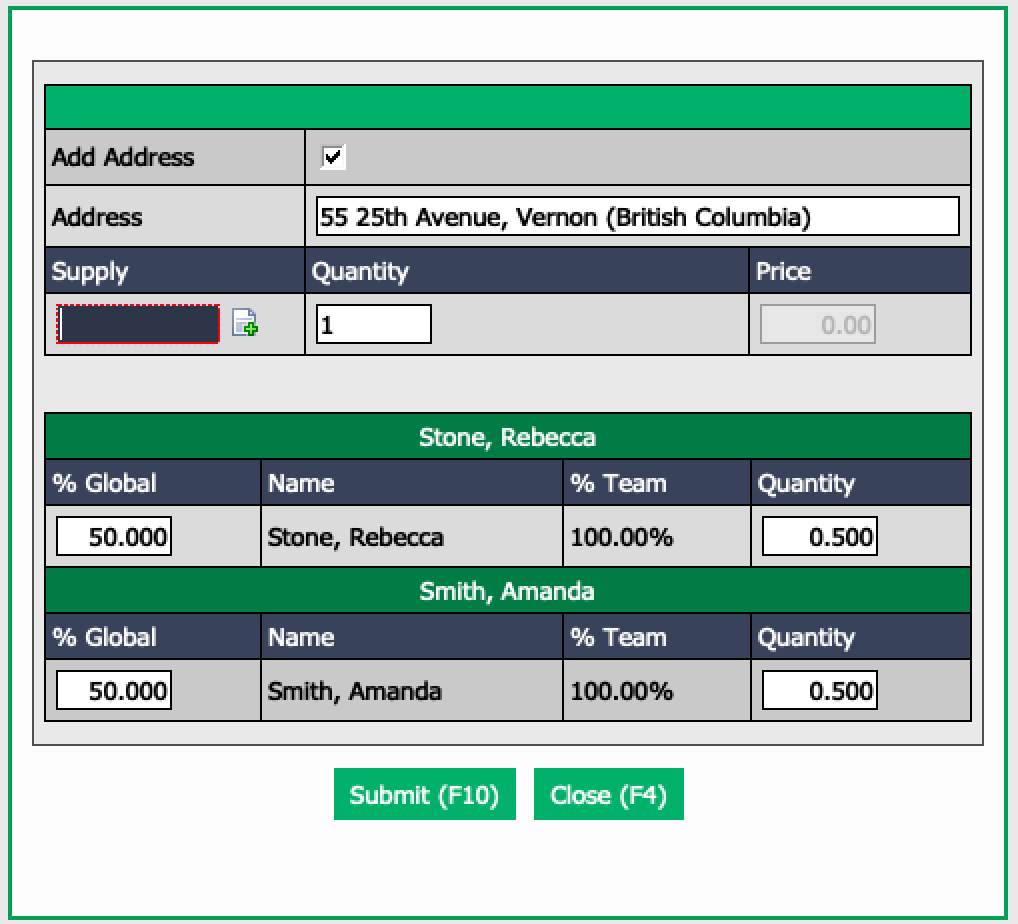
Add Address is checked by default. This means the address of the transaction will appear on the invoice next to the supply name. Uncheck this box if you don’t want the address on the invoice.
Start typing the name of the Supply in the field and select it from the list. If the supply doesn’t appear, you can add one by clicking on the Sheet with a + icon. (For more information, please see the article Adding/Editing a Supply in the System.
Enter the desired Quantity and the Price will be automatically displayed.
% Global: The agents involved in the transaction and the distribution of expenses will be automatically displayed (2 agents on file = they share the expenses 50% – 50%). If needed, you can manually change the expense distribution.
% Team: The distribution amongst team members will be automatically filled according to the team configuration. If needed, you can manually change the team distribution.
Quantity per agent will be automatically calculated based on total quantity and distribution %.
Click on Submit.
Your item is now ready to be invoiced once you generate your monthly invoicing. The supply will always be displayed in the transaction (in the agent’s platform as well).
Information
It is possible to create an invoice for supplies during a commission payment, without going through monthly invoicing. For more information, please see the article Commissions Payable.